Showing posts with label Linux Admin. Show all posts

Monday, July 9, 2018

Linux Admin - Useful Resources

Linux Admin - Useful Resources


The following resources contain additional information on Linux Admin. Please use them to get more in-depth knowledge on this topic.

Useful Links on Linux Admin

Useful Books on Linux Admin

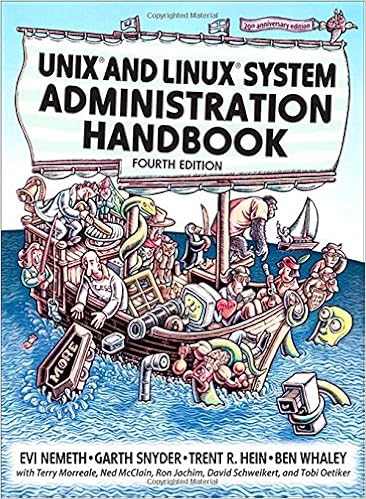
  • UNIX and Linux System Administration Handbook
  • Linux Administration
  • Linux Administration: A Beginner’s Guide
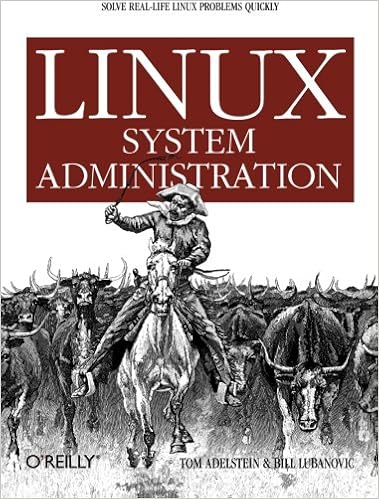
  • Linux System Administration
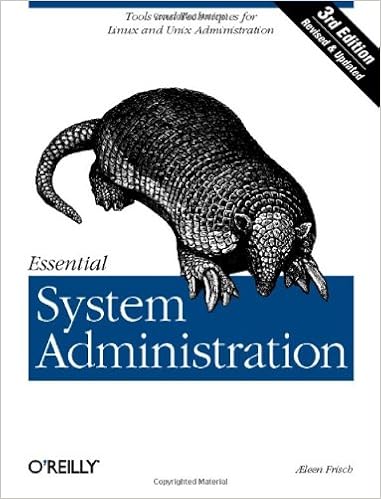
  • Essential System Administration
  • Linux Command Line
To enlist your site on this page, please drop an email to contact@tutorialspoint.com

Linux Admin - Volume Management

Linux Admin - Volume Management


Logical Volume Management (LVM) is a method used by Linux to manage storage volumes across different physical hard disks. This is not to be confused with RAID. However, it can be thought of in a similar concept as RAID 0 or J-Bod. With LVM, it is possible to have (for example) three physical disks of 1TB each, then a logical volume of around 3TB such as /dev/sdb. Or even two logical volumes of 1.5TB, 5 volumes of 500GB, or any combination. One single disk can even be used for snapshots of Logical Volumes.
Note − Using Logical Volumes actually increases disk I/O when configured correctly. This works in a similar fashion to RAID 0 striping data across separate disks.
When learning about volume management with LVM, it is easier if we know what each component in LVM is. Please study the following table to get a firm grasp of each component. If you need to, use Google to study. Understanding each piece of a logical volume is important to manage them.
PVPhysical Volumesda
PPPhysical Partitionsda1 , sda2
VGVolume GroupPooled physical resources
LVLogical VolumeSeen as a storage facility to the operating system
physical volume will be seen as /dev/sda, /dev/sdb; a physical disk that is detected by Linux.
physical partition will be a section of the disk partitioned by a disk utility such as fdisk. Keep in mind, physical partition is not recommended in most common LVM setups. Example: disk /dev/sda is partitioned to include two physical partitions: /dev/sda1 and /dev/sda1
If we have two physical disks of 1TB each, we can create a volume group of almost 2TB amongst the two.
From the volume group, we can create three logical volumes each of any-size not exceeding the total volume group size.

Traditional Linux Disk Administration Tools

Before being acquainted with the latest and greatest featured tools for LVM Management in CentOS 7, we should first explore more traditional tools that have been used for Linux disk management. These tools will come handy and still have use with today's advanced LVM tools such as the System Storage Manager: lsblk, parted, and mkfs.xfs.
Now, assuming we have added another disk or two to our system, we need to enumerate disks detected by Linux. I'd always advise enumerating disks every time before performing operations considered as destructive. lsblk is a great tool for getting disk information. Let's see what disks CentOS detects.
[root@localhost rdc]# lsblk
NAME         MAJ:MIN    RM    SIZE    RO    TYPE MOUNTPOINT
sda            8:0       0     20G     0        disk 
├─sda1         8:1       0      1G     0     part /boot
└─sda2         8:2       0     19G     0        part 
  ├─cl-root  253:0       0     17G     0      lvm  /
  └─cl-swap  253:1       0      2G     0      lvm  [SWAP]
    sdb       8:16       0      6G     0       disk 
    sdc       8:32       0      4G     0       disk 
    sr0       11:0       1   1024M     0       rom 
As you can see, we have three disks on this system: sda, sdb, and sdc.
Disk sda contains our working CentOS installation, so we do not want to toy around with sda. Both sdb and sdc were added to the system for this tutorial. Let's make these disks usable to CentOS.

Create a Disk Label

[root@localhost rdc]# parted /dev/sdb mklabel GPT
Warning: The existing disk label on /dev/sdb will be destroyed and all data on this
   disk will be lost. Do you want to continue?
Yes/No? Yes                               
[root@localhost rdc]#
We now have one disk labeled. Simply run the parted command in the same manner on sdc.

Create the Partitions on the Disk

We will only create a single partition on each disk. To create partitions, the parted command is used again.
[root@localhost rdc]# parted -a opt /dev/sdb mkpart primary ext4 0% 100%
Warning − You requested a partition from 0.00B to 6442MB (sectors 0..12582911).
The closest location we can manage is 17.4kB to 1048kB (sectors 34..2047).
Is this still acceptable to you?
Yes/No? NO
[root@localhost rdc]# parted -a opt /dev/sdc mkpart primary ext4 0% 100%
Information − You may need to update /etc/fstab.
[root@localhost rdc]# lsblk                                               
NAME        MAJ:MIN   RM    SIZE    RO    TYPE MOUNTPOINT
sda           8:0      0     20G     0        disk 
├─sda1        8:1      0      1G     0      part / boot
└─sda2        8:2      0     19G     0        part 
 ├─cl-root  253:0      0     17G     0       lvm  /
 └─cl-swap  253:1      0      2G     0       lvm  [SWAP]
sdb          8:16      0      6G     0        disk 
└─sdb1       8:17      0      6G     0        part 
 sdc         8:32      0      4G     0        disk 
└─sdc1       8:33      0      4G     0        part 
sr0          11:0      1   1024M     0        rom

[root@localhost rdc]#
As you can see from lsblk output, we now have two partitions, each on sdb and sdc.

Make the File System

Finally, before mounting and using any volume we need to add a file system. We will be using the XFS file system.
root@localhost rdc]# mkfs.xfs -f /dev/sdb1
meta-data = /dev/sdb1               isize = 512    agcount = 4, agsize = 393088 blks
            =                      sectsz = 512    attr = 2, projid32bit = 1
            =                         crc = 1      finobt = 0, sparse = 0
data        =                       bsize = 4096   blocks = 1572352, imaxpct = 25
            =                       sunit = 0      swidth = 0 blks
naming      = version 2             bsize = 4096   ascii-ci = 0 ftype = 1
log         = internal log          bsize = 4096   blocks = 2560, version = 2
            =                      sectsz = 512    sunit = 0 blks, lazy-count = 1
realtime    = none                  extsz = 4096   blocks = 0, rtextents = 0
[root@localhost rdc]# mkfs.xfs -f /dev/sdc1
meta-data   = /dev/sdc1             isize = 512    agcount = 4, agsize = 262016 blks
            =                      sectsz = 512    attr = 2, projid32bit = 1
            =                         crc = 1      finobt = 0, sparse = 0
data        =                       bsize = 4096   blocks = 1048064, imaxpct = 25
            =                       sunit = 0      swidth = 0 blks
naming      = version 2             bsize = 4096   ascii-ci = 0 ftype = 1
log         = internal log          bsize = 4096   blocks = 2560, version = 2
            =                      sectsz = 512    sunit = 0 blks, lazy-count = 1
realtime    = none                  extsz = 4096   blocks = 0, rtextents = 0

[root@localhost rdc]# 
Let's check to make sure each have a usable file system.
[root@localhost rdc]# lsblk -o NAME,FSTYPE
NAME           FSTYPE
sda         
├─sda1         xfs
└─sda2         LVM2_member
 ├─cl-root     xfs
 └─cl-swap     swap
sdb         
└─sdb1         xfs
sdc         
└─sdc1         xfs
sr0

[root@localhost rdc]# 
Each is now using the XFS file system. Let's mount them, check the mount, and copy a file to each.
[root@localhost rdc]# mount -o defaults /dev/sdb1 /mnt/sdb
[root@localhost rdc]# mount -o defaults /dev/sdc1 /mnt/sdc

[root@localhost ~]# touch /mnt/sdb/myFile /mnt/sdc/myFile
[root@localhost ~]# ls /mnt/sdb /mnt/sdc
 /mnt/sdb:
  myFile

 /mnt/sdc:
  myFile
We have two usable disks at this point. However, they will only be usable when we mount them manually. To mount each on boot, we must edit the fstab file. Also, permissions must be set for groups needing access to the new disks.

Create Volume Groups and Logical Volumes

One of the greatest addition to CentOS 7 was the inclusion of a utility called System Storage Manager or ssmSystem Storage Manager greatly simplifies the process of managing LVM pools and storage volumes on Linux.
We will go through the process of creating a simple volume pool and logical volumes in CentOS. The first step is installing the System Storage Manager.
[root@localhost rdc]# yum  install system-storage-manager
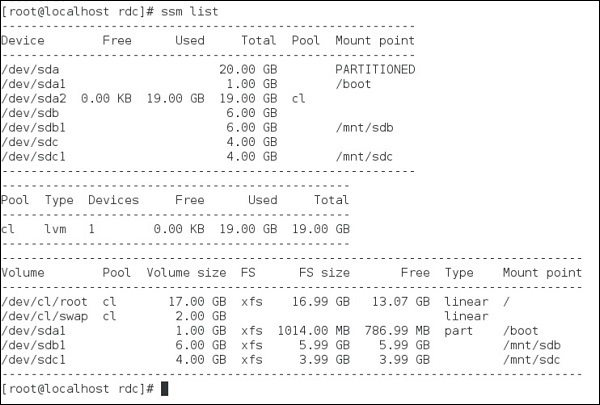
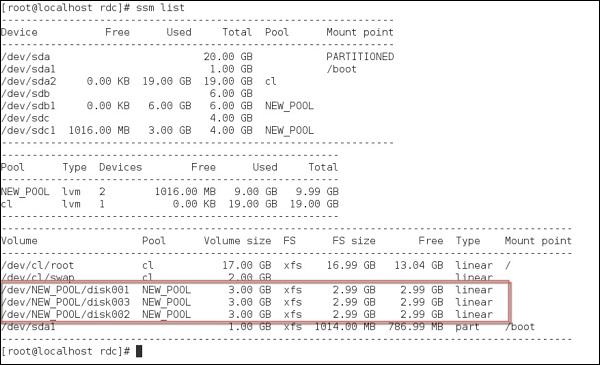
Let's look at our disks using the ssm list command.
SSM List Command
As seen above, a total of three disks are installed on the system.
  • /sdba1 − Hosts our CentOS installation
  • /sdb1 − Mounted at /mnt/sdb
  • /sdc1 − Mounted at /mnt/sdc
What we want to do is make a Volume Group using two disks (sdb and sdc). Then make three 3GB Logical Volumes available to the system.
Let's create our Volume Group.
[root@localhost rdc]# ssm create -p NEW_POOL /dev/sdb1 /dev/sdc1
By default, ssm will create a single logical volume extending the entire 10GB of the pool. We don't want this, so let's remove this.
[root@localhost rdc]# ssm remove /dev/NEW_POOL/lvol001
 Do you really want to remove active logical volume NEW_POOL/lvol001? [y/n]: y
 Logical volume "lvol001" successfully removed
[root@localhost rdc]# 
Finally, let's create the three Logical Volumes.
[root@localhost rdc]# ssm create -n disk001 --fs xfs -s 3GB -p NEW_POOL
[root@localhost rdc]# ssm create -n disk002 --fs xfs -s 3GB -p NEW_POOL
[root@localhost rdc]# ssm create -n disk003 --fs xfs -s 3GB -p NEW_POOL
Now, let's check our new volumes.
Volumes
We now have three separate logical volumes spanned across two physical disk partitions.
Logical volumes are a powerful feature now built into CentOS Linux. We have touched the surface on managing these. Mastering pools and logical volumes come with practice and extended learning from Tutorials Point. For now, you have learned the basics of LVM management in CentOS and possess the ability to create basic striped Logical Volumes on a single host.

Linux Admin - Package Management

Linux Admin - Package Management


Package management in CentOS can be performed in two ways: from the terminal and from the Graphical User Interface.
More often than not a majority of a CentOS administrator's time will be using the terminal. Updating and installing packages for CentOS is no different. With this in mind, we will first explore package management in the terminal, then touch on using the graphical package management tool provided by CentOS.

YUM Package Manager

YUM is the tool provided for package management in CentOS. We have briefly touched this topic in previous chapters. In this chapter, we will be working from a clean CentOS install. We will first completely update our installation and then install an application.
YUM has brought software installation and management in Linux a long way. YUM "automagically” checks for out-of-date dependencies, in addition to out-of-date packages. This has really taken a load off the CentOS administrator compared to the old days of compiling every application from source-code.

yum check-update

Checks for packages that can update candidates. For this tutorial, we will assume this a production system that will be facing the Internet with no production applications that needs to be tested by DevOps before upgrading the packages. Let us now install the updated candidates onto the system.
[root@localhost rdc]# yum check-update
Loaded plugins: fastestmirror, langpacks
Loading mirror speeds from cached hostfile
 * base: mirror.scalabledns.com
 * extras: mirror.scalabledns.com
 * updates: mirror.clarkson.edu
NetworkManager.x86_64                     1:1.4.0-19.el7_3              updates
NetworkManager-adsl.x86_64                1:1.4.0-19.el7_3              updates 
NetworkManager-glib.x86_64                1:1.4.0-19.el7_3              updates 
NetworkManager-libnm.x86_64               1:1.4.0-19.el7_3              updates 
NetworkManager-team.x86_64                1:1.4.0-19.el7_3              updates 
NetworkManager-tui.x86_64                 1:1.4.0-19.el7_3              updates 
NetworkManager-wifi.x86_64                1:1.4.0-19.el7_3              updates 
audit.x86_64                              2.6.5-3.el7_3.1               updates    
vim-common.x86_64                         2:7.4.160-1.el7_3.1           updates 
vim-enhanced.x86_64                       2:7.4.160-1.el7_3.1           updates 
vim-filesystem.x86_64                     2:7.4.160-1.el7_3.1           updates 
vim-minimal.x86_64                        2:7.4.160-1.el7_3.1           updates 
wpa_supplicant.x86_64                     1:2.0-21.el7_3                updates 
xfsprogs.x86_64                           4.5.0-9.el7_3                 updates

[root@localhost rdc]#

yum update

This will install all updated candidates making your CentOS installation current. With a new installation, this can take a little time depending on your installation and your internet connection speed.
[root@localhost rdc]# yum update

vim-minimal                        x86_64    2:7.4.160-1.el7_3.1     updates    436 k 
wpa_supplicant                     x86_64    1:2.0-21.el7_3          updates    788 k 
xfsprogs                           x86_64    4.5.0-9.el7_3           updates    895 k  

Transaction Summary 
======================================================================================
Install    2 Packages 
Upgrade  156 Packages  
Total download size: 371 M

Is this ok [y/d/N]:

Install Software via YUM

Besides updating the CentOS system, the YUM package manager is our go-to tool for installing the software. Everything from network monitoring tools, video players, to text editors can be installed from a central repository with YUM.
Before installing some software utilities, let's look at few YUM commands. For daily work, 90% of a CentOS Admin's usage of YUM will be with about 7 commands. We will go over each in the hope of becoming familiar with operating YUM at a proficient level for daily use. However, like most Linux utilities, YUM offers a wealth of advanced features that are always great to explore via the man page. Use man yum will always be the first step to performing unfamiliar operations with any Linux utility.

Most Common YUM Commands

Following are the commonly used YUM commands.
CommandAction
list installedLists packages installed via YUM
list allLists all currently available packages
group listLists grouped packages
infoProvides detailed information about a package
searchSearches package descriptions and names
installInstalls a package
localinstallInstalls a local rpm package
removeRemoves and installs package
clean allCleans /var/cache/yum to free disk-space
man yumLike all linux commands, the help file

Install Software with YUM

We will now install a text-based web browser called Lynx. Before installation, we must first get the package name containing the Lynx web browser. We are not even 100% sure our default CentOS repository provides a package for the Lynx web browser, so let's search and see −
[root@localhost rdc]# yum search web browser
Loaded plugins: fastestmirror, langpacks
Loading mirror speeds from cached hostfile
 * base: mirror.scalabledns.com
 * extras: mirror.scalabledns.com 
 * updates: mirror.clarkson.edu 
=================================================================
N/S matched: web, browser
================================================================== 
icedtea-web.x86_64 : Additional Java components for OpenJDK - Java browser
plug-in and Web Start implementation
elinks.x86_64 : A text-mode Web browser
firefox.i686 : Mozilla Firefox Web browser
firefox.x86_64 : Mozilla Firefox Web browser
lynx.x86_64 : A text-based Web browser

Full name and summary matches only, use "search all" for everything.
 
[root@localhost rdc]#
We see, CentOS does offer the Lynx web browser in the repository. Let's see some more information about the package.
[root@localhost rdc]# lynx.x86_64
bash: lynx.x86_64: command not found...
[root@localhost rdc]# yum info lynx.x86_64
Loaded plugins: fastestmirror, langpacks
Loading mirror speeds from cached hostfile
 * base: mirror.scalabledns.com
 * extras: mirror.scalabledns.com
 * updates: mirror.clarkson.edu
Available Packages
Name        : lynx
Arch        : x86_64
Version     : 2.8.8
Release     : 0.3.dev15.el7
Size        : 1.4 M
Repo        : base/7/x86_64
Summary     : A text-based Web browser
URL         : http://lynx.isc.org/
License     : GPLv2
Description : Lynx is a text-based Web browser. Lynx does not display any images, 
            : but it does support frames, tables, and most other HTML tags. One 
            : advantage Lynx has over graphical browsers is speed; Lynx starts and
            : exits quickly and swiftly displays web pages.
            
[root@localhost rdc]#
Nice! Version 2.8 is current enough so let's install Lynx.
[root@localhost rdc]# yum install lynx
Loaded plugins: fastestmirror, langpacks
Loading mirror speeds from cached hostfile
 * base: mirror.scalabledns.com
 * extras: mirror.scalabledns.com
 * updates: mirror.clarkson.edu 
Resolving Dependencies
--> Running transaction check 
---> Package lynx.x86_64 0:2.8.8-0.3.dev15.el7 will be installed 
--> Finished Dependency Resolution  
Dependencies Resolved  
===============================================================================
===============================================================================
Package                          Arch
Version                       Repository                    Size 
===============================================================================
===============================================================================
Installing: 
 lynx                           x86_64
2.8.80.3.dev15.el7              base                        1.4 M

Transaction Summary
===============================================================================
===============================================================================
Install  1 Package

Total download size: 1.4 M 
Installed size: 5.4 M 
Is this ok [y/d/N]: y 
Downloading packages: 
No Presto metadata available for base
lynx-2.8.8-0.3.dev15.el7.x86_64.rpm
| 1.4 MB  00:00:10      
Running transaction check 
Running transaction test 
Transaction test succeeded 
Running transaction 
   Installing : lynx-2.8.8-0.3.dev15.el7.x86_64
1/1
   Verifying  : lynx-2.8.8-0.3.dev15.el7.x86_64
1/1

Installed: 
   lynx.x86_64 0:2.8.8-0.3.dev15.el7
Complete!

[root@localhost rdc]#  
Next, let's make sure Lynx did in fact install correctly.
[root@localhost rdc]# yum list installed | grep -i lynx

lynx.x86_64                   2.8.8-0.3.dev15.el7              @base     
[root@localhost rdc]#
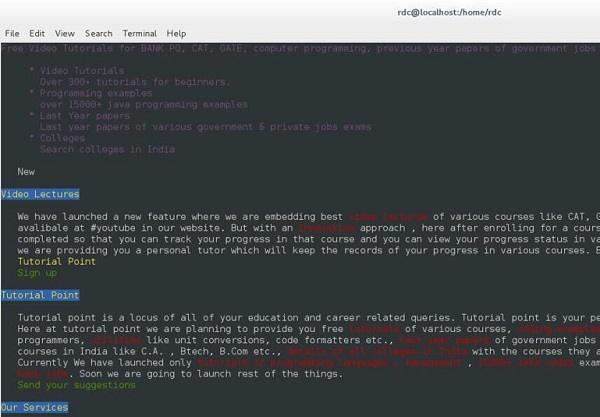
Great! Let's use Lynx to and see what the web looks like without "likes" and pretty pictures.
[root@localhost rdc]# lynx www.tutorialpoint.in
Install Software with YUM
Great, now we have a web browser for our production server that can be used without much worry into remote exploits launched over the web. This a good thing for production servers.
We are almost completed, however first we need to set this server for developers to test applications. Thus, let's make sure they have all the tools needed for their job. We could install everything individually, but CentOS and YUM have made this a lot faster. Let's install the Development Group Package.
[root@localhost rdc]# yum groups list 
Loaded plugins: fastestmirror, langpacks 
Loading mirror speeds from cached hostfile 
 * base: mirror.scalabledns.com 
 * extras: mirror.scalabledns.com 
 * updates: mirror.clarkson.edu
 
Available Groups: 
   Compatibility Libraries 
   Console Internet Tools 
   Development Tools 
   Graphical Administration Tools
   Legacy UNIX Compatibility 
   Scientific Support 
   Security Tools 
   Smart Card Support 
   System Administration Tools 
   System Management 
Done

[root@localhost rdc]#
This is a smaller list of Package Groups provided by CentOS. Let's see what is included with the "Development Group".
[root@localhost rdc]# yum group info "Development Tools" 
Loaded plugins: fastestmirror, langpacks 
There is no installed groups file. 
Maybe run: yum groups mark convert (see man yum) 
Loading mirror speeds from cached hostfile 
 * base: mirror.scalabledns.com 
 * extras: mirror.scalabledns.com 
 * updates: mirror.clarkson.edu
 
Group: Development Tools 
Group-Id: development 
Description: A basic development environment. 
Mandatory Packages: 
autoconf 
automake 
binutils 
bison 
The first screen of output is as seen above. This entire list is rather comprehensive. However, this group will usually be needed to be installed in its entirety as time goes by. Let's install the entire Development Group.
[root@localhost rdc]# yum groupinstall "Development Tools"
This will be a larger install. When completed, your server will have most development libraries and compilers for Perl, Python, C, and C++.

Graphical Package Management in CentOS

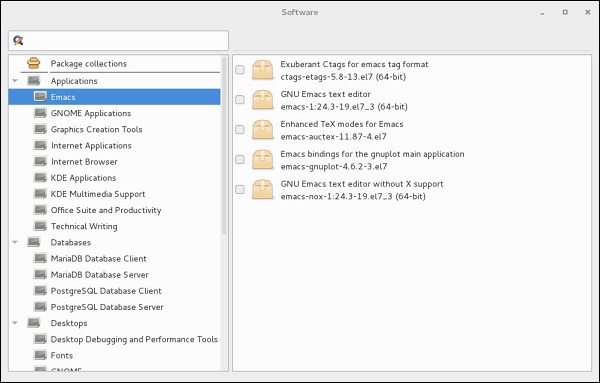
Gnome Desktop provides a graphical package management tool called Software. It is fairly simple to use and straightforward. Software, the Gnome package management tool for CentOS can be found by navigating to: Applications → System Tools → Software.
The Software Package Management Tool is divided into groups allowing the administrator to select packages for installation. While this tool is great for ease-of-use and simplicity for end-users, YUM is a lot more powerful and will probably be used more by administrators.
Following is a screenshot of the Software Package Management Tool, not really designed for System Administrators.
Software Package Management Tool

Linux Admin - Shell Scripting

Linux Admin - Shell Scripting


Advertisements


Introduction to Bash Shell

Like flavors of GNU Linux, shells come in many varieties and vary in compatibility. The default shell in CentOS is known as the Bash or Bourne Again Shell. The Bash shell is a modern day, modified version of Bourne Shell developed by Stephen Bourne. Bash was the direct replacement to the original Thompson Shell on the Unix operating system developed at Bell Labs by Ken Thompson and Dennis Ritchie (Stephen Bourne was also employed by Bell Labs)
Everyone has a favorite shell and each has its strengths and difficulties. But for the most part, Bash is going to be the default shell across all Linux distributions and most commonly available. With experience, everyone will want to explore and use a shell that is best for them. However at the same time, everyone will also want to master Bash shell.
Other Linux shells include: Tcsh, Csh, Ksh, Zsh, and Fish.
Developing skills to use any Linux shell at an expert level is extremely important to a CentOS administrator. As we mentioned previously, unlike Windows, Linux at its heart is a command line operating system. A shell is simply a user interface that allows an administrator (or user) to issue commands to the operating system. If a Linux system administrator were an airlines pilot, using the shell would be similar to taking the plane off auto-pilot and grabbing the manual controls for more maneuverable flight.
A Linux shell, like Bash, is known in Computer Science terms as a Command Line Interpreter. Microsoft Windows also has two command line interpreters called DOS (not to be confused with the original DOS operating system) and PowerShell.
Most modern shells like Bash provide constructs allowing more complex shell scripts to automate both common and complex tasks.
Constructs include −
  • Script flow control (ifthen and else)
  • Logical comparison operations (greater than, less than, equality)
  • Loops
  • Variables
  • Parameters defining operation (similar to switches with commands)

Using Shell Script Versus Scripting Language

Often when thinking about performing a task administrators ask themselves: Should I use a shell script or a scripting language such as Perl, Ruby or Python?
There is no set rule here. There are only typical differences between shells versus scripting languages.

Shell

Shell allows the use of Linux commands such as sedgrepteecat and all other command-line based utilities on the Linux operating system. In fact, pretty much any command line Linux utility can be scripted in your shell.
A great example of using a shell would be a quick script to check a list of hosts for DNS resolution.
Our simple Bash Script to check DNS names −
#!/bin/bash 
for name in $(cat $1);
   do 
      host $name.$2 | grep "has address" 
   done 
exit
small wordlist to test DNS resolution on −
dns 
www 
test 
dev 
mail 
rdp 
remote
Output against google.com domain −
[rdc@centos ~]$  ./dns-check.sh dns-names.txt google.com
-doing dns
dns.google.com has address 172.217.6.46
-doing www
www.google.com has address 172.217.6.36
-doing test
-doing dev
-doing mail
googlemail.l.google.com has address 172.217.6.37
-doing rdp
-doing remote

[rdc@centos ~]$
Leveraging simple Linux commands in our shell, we were able to make a simple 5-line script to audit DNS names from a word list. This would have taken some considerable time in Perl, Python, or Ruby even when using a nicely implemented DNS Library.

Scripting Language

A scripting language will give more control outside the shell. The above Bash script used a wrapper around the Linux host command. What if we wanted to do more and make our own application like host to interact outside the shell? This is where we would use a scripting language.
Also, with a highly maintained scripting language we know our actions will work across different systems for the most part. Python 3.5, for example, will work on any other system running Python 3.5 with the same libraries installed. Not so, if we want to run our BASH script on both Linux and HP-UX.
Sometimes the lines between a scripting language and a powerful shell can be blurred. It is possible to automate CentOS Linux administration tasks with Python, Perl or Ruby. Doing so is really quite commonplace. Also, affluent shell-script developers have made a simple, but otherwise functional, web-server daemon in Bash.
With experience in scripting languages and automating tasks in shells, a CentOS administrator will be able to quickly determine where to start when needing to solve a problem. It is quite common to start a project with a shell script. Then progress to a scripting (or compiled) language as a project gets more complex.
Also, it is ok to use both a scripting language and shell script for different parts of a project. An example could be a Perl script to scrape a website. Then, use a shell script to parse and format with sedawk, and egrep. Finally, use a PHP script for inserting formatted data into MySQL database using a web GUI.
With some theory behind shells, let's get started with the basic building blocks to automate tasks from a Bash shell in CentOS.

Input Output and Redirection

Processing stdout to another command −
[rdc@centos ~]$ cat ~/output.txt | wc -l 
6039 
[rdc@centos ~]$
Above, we have passed cat'sstoud to wc for processing with the pipecharacter. wc then processed the output from cat, printing the line count of output.txt to the terminal. Think of the pipe character as a "pipe" passing output from one command, to be processed by the next command.
Following are the key concepts to remember when dealing with command redirection −
NumberFile descriptorCharacter
0standard input<
1standard output>
2standard error
append stdout>>
assign redirection&
pipe stdout into stdin|
We introduced this in chapter one without really talking much about redirection or assigning redirection. When opening a terminal in Linux, your shell is seen as the default target for −
  • standard input < 0
  • standard output > 1
  • standard error 2
Let's see how this works −
[rdc@centos ~]$ lsof -ap $BASHPID -d 0,1,2 
 COMMAND   PID   USER    **FD**   TYPE DEVICE   SIZE/OFF   NODE      NAME 
 bash    13684    rdc    **0u**   CHR  136,0      0t0     3      /dev/pts/0 
 bash    13684    rdc    **1u**   CHR  136,0      0t0     3      /dev/pts/0 
 bash    13684    rdc    **2u**   CHR  136,0      0t0     3      /dev/pts/0
 
[rdc@centos ~]$  
/dev/pts/0 is our pseudo terminal. CentOS Linux looks at this and thinks of our open terminal application like a real terminal with the keyboard and display plugged in through a serial interface. However, like a hypervisor abstracts hardware to an operating system /dev/pts abstracts our terminal to applications.
From the above lsof command, we can see under the FD column that all three file-descriptors are set to our virtual terminal (0,1,2). We can now send commands, see command output, as well as any errors associated with the command.
Following are examples for STDIN and STDOUT −

STDOUT

[root@centosLocal centos]# echo "I am coming from Standard output or STDOUT." >
output.txt && cat output.txt
I am coming from Standard output or STDOUT. 
[root@centosLocal centos]#
It is also possible to send both stdout and stderr to separate files −
bash-3.2# find / -name passwd 1> good.txt 2> err.txt
bash-3.2# cat good.txt
/etc/pam.d/passwd
/etc/passwd
bash-3.2# cat err.txt 
find: /dev/fd/3: Not a directory
find: /dev/fd/4: Not a directory
bash-3.2#
When searching the entire file system, two errors were encountered. Each were sent to a separate file for later perusal, while the results returned were placed into a separate text file.
Sending stderr to a text file can be useful when doing things that output a lot of data to the terminal like compiling applications. This will allow for perusal of errors that could get lost from terminal scrollback history.
One note when passing STDOUT to a text file are the differences between >>and >. The double ">>" will append to a file, while the singular form will clobber the file and write new contents (so all previous data will be lost).

STDIN

[root@centosLocal centos]# cat < stdin.txt
Hello,
I am being read form Standard input, STDIN.

[root@centosLocal centos]#
In the above command, the text file stdin.txt was redirected to the catcommand which echoed its content to STDOUT.

The pipe character "|"

The pipe character will take the output from the first command, passing it as an input into the next command, allowing the secondary command to perform operations on the output.
Now, let's "pipe" the stdout of cat to another command −
[root@centosLocal centos]# cat output.txt | wc -l
2
[root@centosLocal centos]#
Above, wc performs calculations on output from cat which was passed from the pipe. The pipe command is particularly useful when filtering the output from grep or egrep −
[root@centosLocal centos]# egrep "^[0-9]{4}$" /usr/dicts/nums | wc -l  
9000 
[root@centosLocal centos]#
In the above command, we passed every 4 digit number to wc from a text file containing all numbers from 65535 passed through an egrep filter.

Redirecting Output with &

Output can be redirected using the & character. If we want to direct the output both STDOUT and STDERR, into the same file, it can be accomplished as follows −
[root@centosLocal centos]# find / -name passwd > out.txt 2>&1
[root@centosLocal centos]# cat out.txt  
find: /dev/fd/3: Not a directory 
find: /dev/fd/4: Not a directory 
/etc/passwd

[root@centosLocal centos]#
Redirecting using the & character works like this: first, the output is redirected into out.txt. Second, STDERR or the file descriptor 2 is reassigned to the same location as STDOUT, in this case out.txt.
Redirection is extremely useful and comes in handy while solving problems that surgace when manipulating large text-files, compiling source code, redirecting the output in shell scripts, and issuing complex Linux commands.
While powerful, redirection can get complicated for newer CentOS Administrators. Practice, research, and occasional question to a Linux forum (such as Stack Overflow Linux) will help solve advanced solutions.

Bash Shell Constructs

Now that we have a good idea of how the Bash shell works, let's learn some basic constructs, commonly used, to write scripts. In this section we will explore −

BASH Troubleshooting Hints

BASH can be a little tricky compared to a dedicated scripting language. Some of the biggest hang-ups in BASH scripts are from incorrectly escaping or not escaping script operations being passed to the shell. If you have looked over a script a few times and it is not working as expected, don't fret. This is common even with those who use BASH to create complex scripts daily.
A quick search of Google or signing up at an expert Linux forum to ask a question will lead to a quick resolution. There is a very likely chance someone has come across the exact issue and it has already been solved.
BASH scripting is a great method of quickly creating powerful scripts for everything from automating administration tasks to creating useful tools. Becoming an expert level BASH script developer takes time and practice. Hence, use BASH scripts whenever possible, it is a great tool to have in your CentOS Administration toolbox.