Showing posts with label Eclipse. Show all posts

Friday, July 13, 2018

Eclipse - Web Browsers

Eclipse - Web Browsers

Internal Web Browser

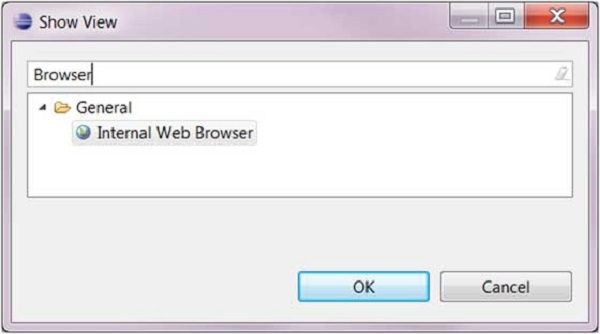
The Internal Web Browser view allows you to surf the internet from within the Eclipse Workbench Window. To activate the Internal Web Browser view click on the Window and select Show View → Other.
In the filter text box of the Show View dialog box enter browser. From the tree select Internal Web Browser and click OK.
Internal Web Browser
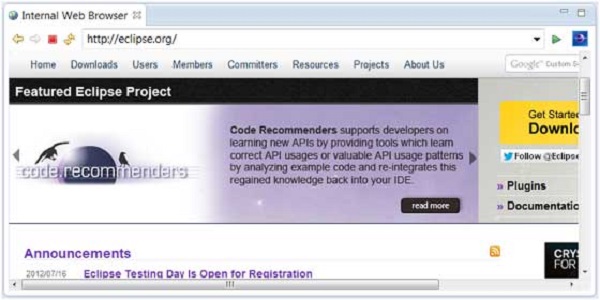
To navigate to a web page, in the URL text box of the Internal Web Browser view enter a URL for that web page.
URL Text Box

Eclipse - Tips & Tricks

Eclipse - Tips & Tricks

TIP #1 − DISCOVERING SHORTCUT KEYS
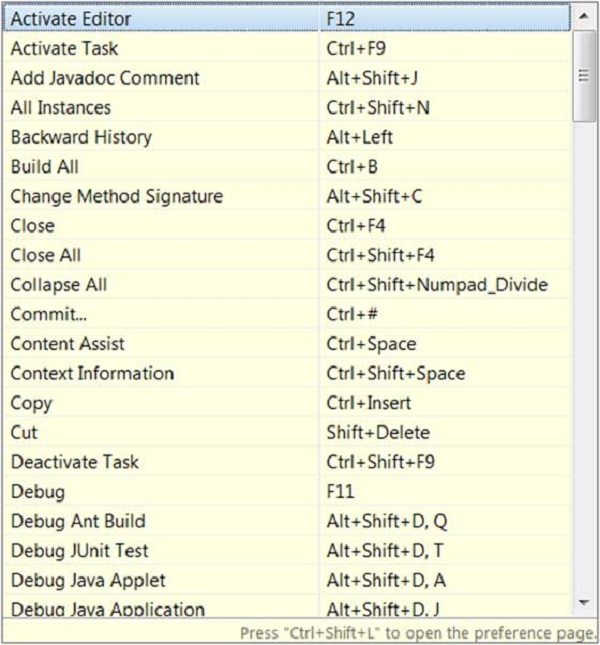
  • Press Ctrl + Shift + L to open a widget that shows all the shortcut keys.
TIP #2 − CONTENT ASSIST
  • In the Java editor press Ctrl + Space to see a list of suggested completions. Typing one or more characters before clicking Ctrl + Space will shorten the list.
TIP #3 − PARAMETER HINT
  • When the cursor is in a method argument, press Ctrl + Shift + Spaceto see a list of parameter hints.
TIP #4 − CAMEL CASE SUPPORT IN CODE COMPLETION
  • Code completion supports camel case patterns. Entering NPE and clicking Ctrl + Space will propose NullPointerException and NoPermissionException.
TIP #5 − CREATING GETTERS AND SETTERS
  • Click on Source → Generate Getter and Setter to open the wizard that allows you to generate getter and setter methods.
TIP #6 − GENERATING HASHCODE() AND EQUALS() METHODS
  • Click on Source → Generate hashCode() and equals() to generate this methods for a Java class.
TIP #7 − ADDING CODE AROUND A BLOCK OF CODE
  • Select a block of code and press Alt+Shift+Z to see a menu of items like if statement, for loop, try/catch etc that can enclose the selected block of code.
TIP #8 − LOCATING A MATCHING BRACKET
  • Select an opening or closing bracket and press Ctrl+Shift+P to find its matching bracket.
TIP #9 − SMART JAVADOC
  • Type '/**' and press Enter to automatically addes a Javadoc comment stub.
TIP #10 − ORGANIZAING IMPORTS
  • Press Ctrl+Shift+O to organize all the imports.
TIP #11 − ACTIVATING THE MENU BAR
  • Press F10 to activate the Menu bar.
TIP #12 − MAKING A VIEW/EDITOR ACTIVE
  • Press Ctrl+F7 to see a list of open views and editor area and switch to one of them.

Eclipse - Restart Option

Eclipse - Restart Option


Restarting Eclipse
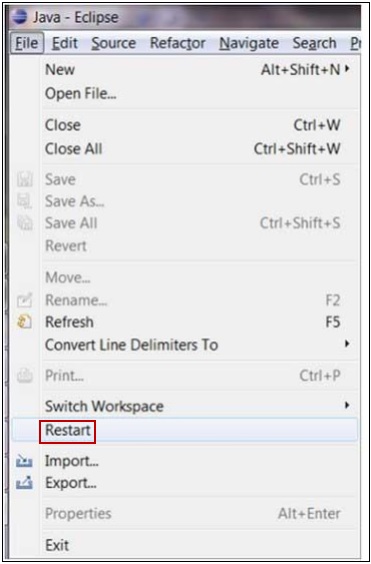
The restart option allows users to restart eclipse. To restart eclipse, click on the File menu and select the Restart menu item.
Restart Option
After a plug-in is installed, users will be prompted to restart eclipse. If they choose not to restart at that point they can restart eclipse later by using the restart option. If eclipse user interface misbehaves, users may want to restart eclipse using this option.

Eclipse - Shortcuts

Eclipse - Shortcuts


About Shortcuts
You can navigate the Eclipse User Interface using only the keyboard by −
  • Using mnemonics associated with menus and menu items.
  • Using mnemonics associated with controls in a dialog box or view or editor.
  • Using accelerators associated with actions such as menu items and buttons on the toolbar.
Shortcuts in Toolbar
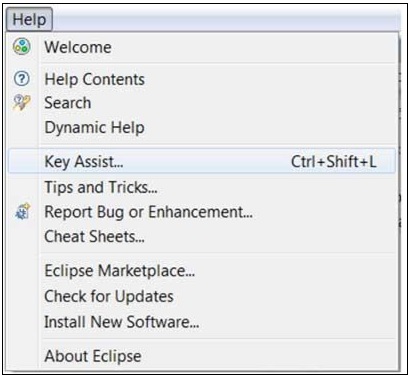
The Key Assist action which can be invoked by clicking Ctrl + Shift + L shows us all the accelerators or shortcut keys available in Eclipse.
Shortcut Keys
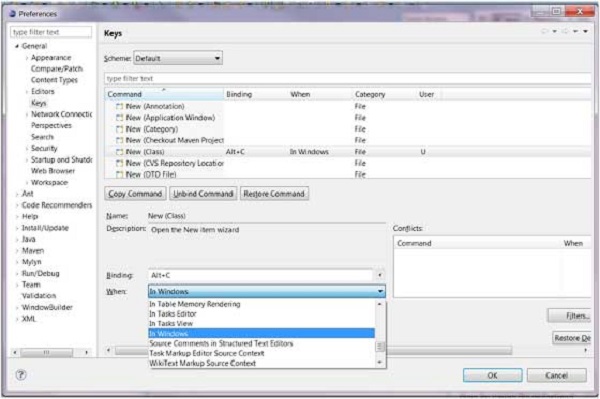
The key combination assigned to an action can be changed using the Keys preference page. There are many commands or actions in Eclipse for which there are no shortcut keys. This preference page also allows you to assign shortcut keys to these actions.
For example, to assign Alt + C as the shortcut key to trigger the command that brings up the New Class dialog box select New Class in the command list, navigate to the Bindings text box and then press Alt + C. The when dropdown list allows you to select a context in which the shortcut key is valid. Ensure that there are no conflicts for the selected key combination and click on the OK button.
Key Combination
Now you can press Alt + C to bring up the New Class wizard.

Eclipse - Code Templates

Eclipse - Code Templates


Using Code Templates
Code templates help reduce typing time by inserting code into the editor. Each code template is given a short literal. Typing the literal into the editor window and press Ctrl + Space brings up a dialog box from which a code template associated with that literal can be selected.
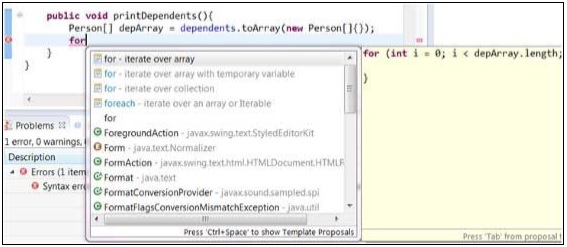
Typing for within the body of a method in the java editor window and clicking Ctrl + space shows the code templates associated with for.
Code Template
Selecting for - iterate over array inserts code for iterating through depArray which was declared earlier in the method body.
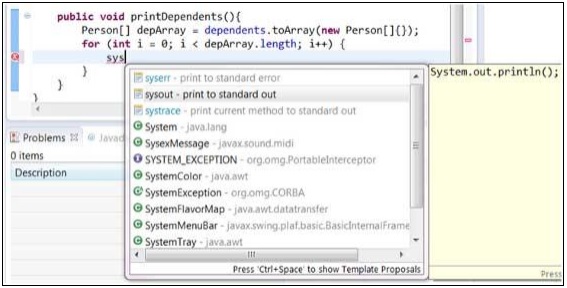
Another useful code template literal is sysout which can be used to insert the System.out.println() method call.
Another Code Template

Modifying/Adding code templates

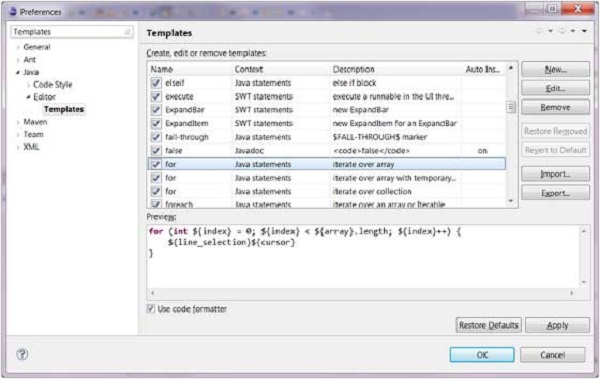
You can add new code templates using the Preferences dialog box. Bring up the Preferences dialog box by clicking on the Windows menu and selecting the Preferences menu item. To locate the Templates page type Templates into the filter text box.
Adding Code Template
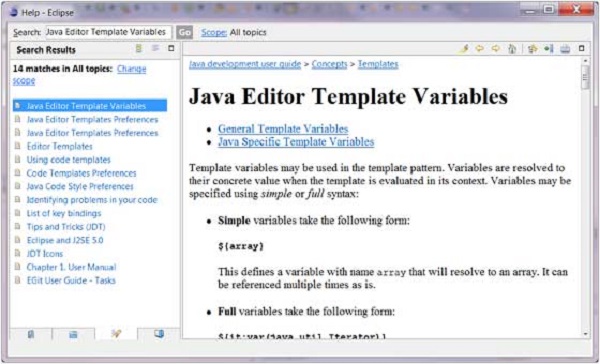
You can read more about the variables that can be used to customize the code that is inserted by reading the Eclipse help. To bring up the help window click on the Help menu and select Help Contents. In the search text box enter Java Editor Template Variables. From the list on the left hand side select Java Editor Template Variables.
Java Editor Template Variables

Eclipse - Install Plugins

Eclipse - Install Plugins


Locating and Installing Plug-ins
The Eclipse platform which provides the foundation for the Eclipse IDE is composed of plug-ins and is designed to be extensible using additional plug-ins.
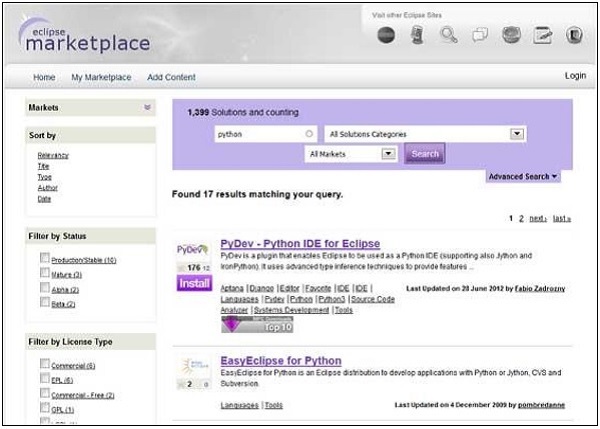
Several hundreds of plug-ins are available. Each plug-in adds more functionality to Eclipse. You can locate a plug-in that provides certain functionality by searching the Eclipse Market place (http://marketplace.eclipse.org/). For example you can locate plug-ins that allows eclipse to be used as a Python IDE.
Plug-in Adds
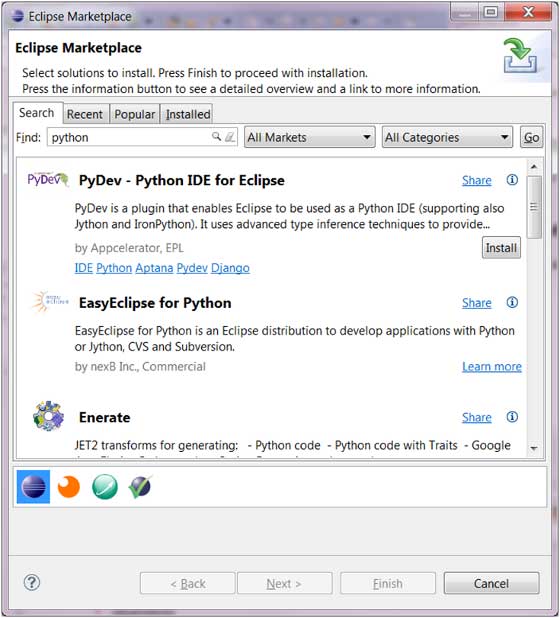
From within the Eclipse IDE, you can search the market place by using the Eclipse Marketplace dialog which can be invoked by clicking on the Help menu and selecting Eclipse Marketplace.
Eclipse Marketplace
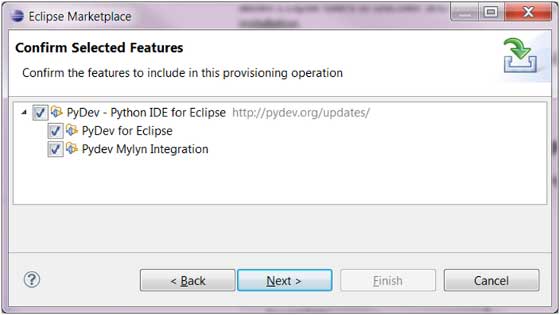
In the screenshot above, to install PyDev-Python IDE for Eclipse, just click on the Install button. Using the dialog box that comes up you can install the plug-in.
Confirm Selected Features
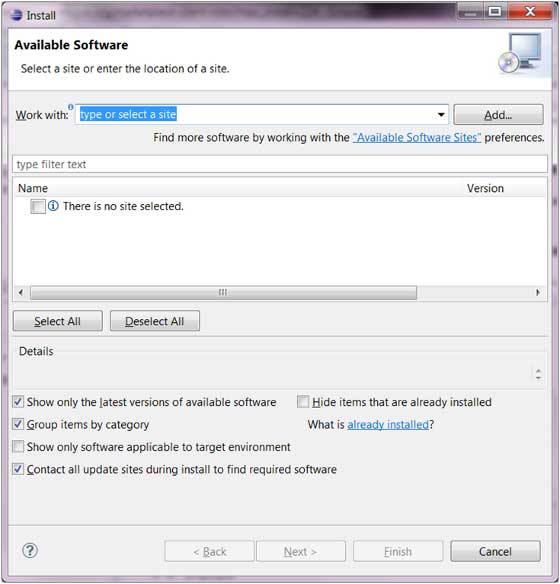
You can also install a plug-in by using the Install New Software menu item accessible from the Help menu (Help → Install New Software).
Install New Software
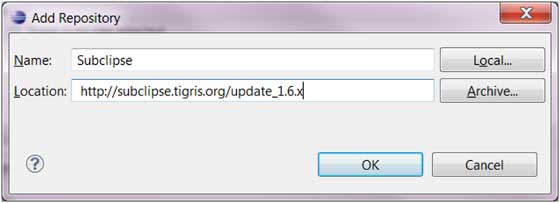
In this case you have to know the URL of the remote site from which the plug-in can be downloaded. You can supply this URL by clicking on the Add button.
Add Repository
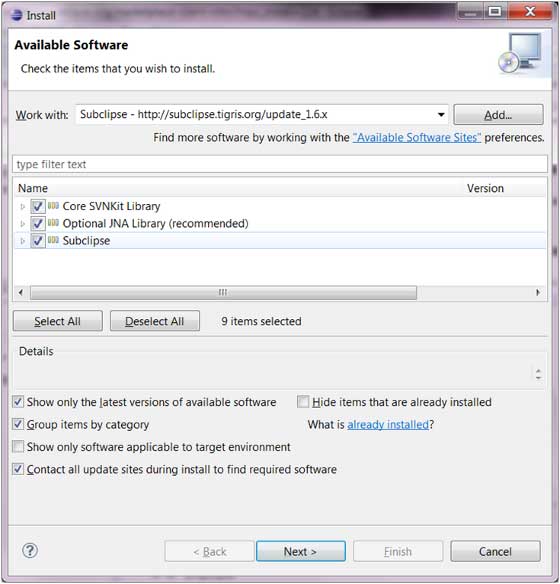
The install dialog box shows the plug-in components available in the remote site and allows you to install them.
Show Install Software

Eclipse - Task Management

Eclipse - Task Management


Managing Tasks
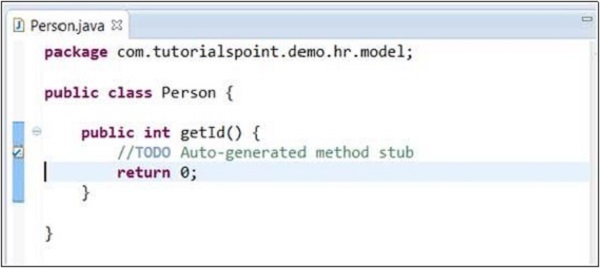
Programmers like to place TODO markers in their code which serves as a reminder for tasks that need to be completed. Comments in the Java code that has the word TODO in them are recognized as task and shown on the marker bar and in the Tasks view.
Task View
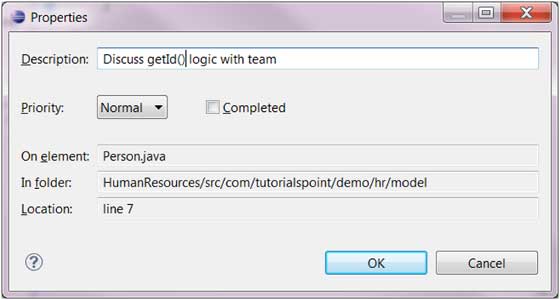
An eclipse editor can be used to associate tasks with the file being edited by right clicking on the marker bar and selecting Add Task. In the dialog box that comes up enter the task description and select a priority from the priority drop down list and then click on the OK button.
Properties
To remove a task using an Eclipse editor, right-click on the task icon in the marker bar and select the Remove Task menu item.

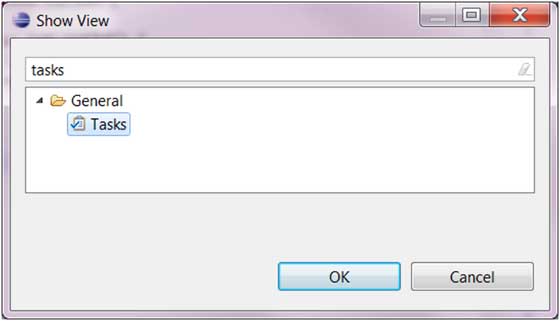
Opening the Tasks View

To open the Tasks view −
  • Click on the Window menu and select Show View → Other.
  • In the filter text box enter Tasks.
  • Under General, select Tasks.
Show View
  • Click OK.

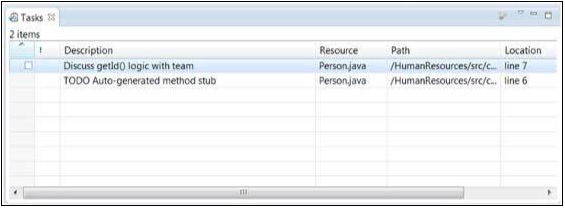
Using the Tasks View

The Tasks view can be used to view all the tasks and add tasks not associated with any resource.
Task View
It can also be used to −
  • Change the priority associated with a task.
  • Mark a task as completed.
  • Remove a task or all completed tasks.

Eclipse - Add Bookmarks

Eclipse - Add Bookmarks


About Bookmarks
Eclipse editors allow you to place a book mark on any line within the editor. You can use bookmarks to serve as reminders and quickly navigate to any line in a file.

Adding a Bookmark

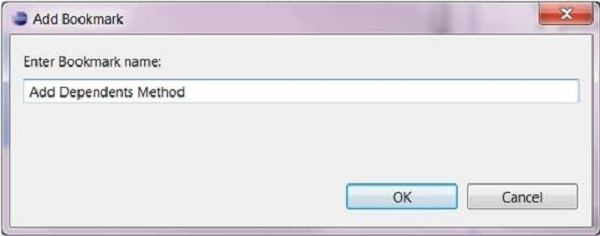
To set a bookmark, right-click on the vertical ruler near the line on which you want the bookmark and select Add Bookmark. In the Add Bookmark dialog box enter a name for the Bookmark.
Add Bookmark
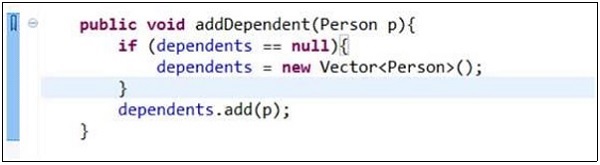
A bookmark icon appears in the vertical ruler. Also, a row is added to the table in the Bookmarks view.
Bookmark View

Opening the Bookmarks View

To open the Bookmarks view −
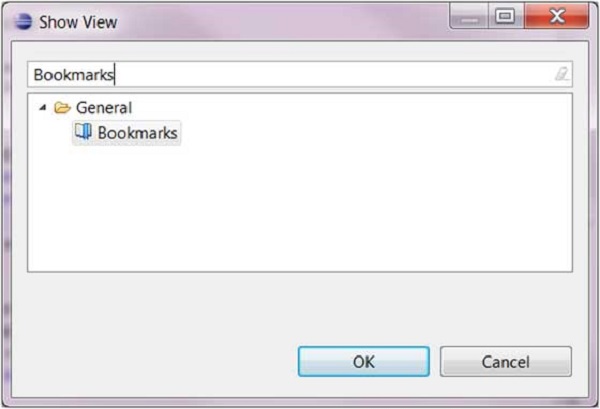
  • Click on the Window menu and select Show View → Other.
  • In the filter text box enter Bookmark.
  • Under General, select Bookmarks.
Show View
  • Click on OK.

Using the Bookmarks View

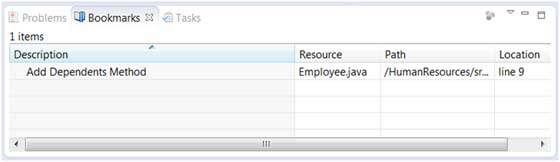
The Bookmarks view shows bookmarks placed in resources across the workspace.
Bookmark View Workspace
Using the Bookmarks view you can navigate to a bookmark by double clicking on a bookmark or right clicking on a bookmark and selecting "Go to" menu item.

Eclipse - Refactoring

Eclipse - Refactoring


Refactoring using Eclipse
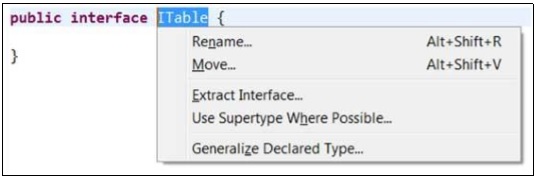
Renaming a class that is used widely throughout a project could take a lot of time but the Eclipse refactoring wizard makes the job easier by automatically detecting all dependencies on the class being renamed and modifying them also.
The refactor menu can be opened by −
  • Right clicking on a Java element in the Package Explorer view and selecting Refactor menu item.
  • Right clicking on a Java element in the Java editor and selecting Refactor menu item.
  • Selecting a Java element in either the Package Explorer view or Java Editor and clicking Shift + Alt + T.
Refactoring
The refactor menu shows all the possible changes that are supported on the selected Java element. To rename a class, select the Rename menu item.
Rename Menu
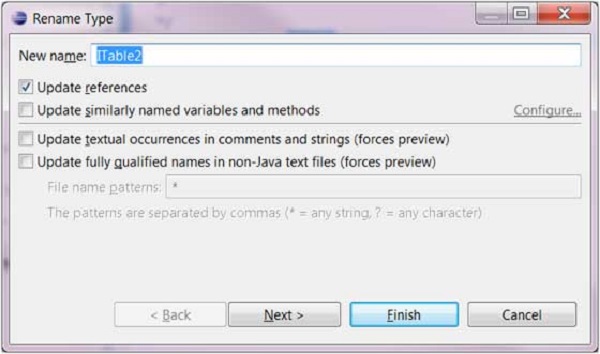
Click on the Next button to see a preview of the changes (if available). Then click on Finish to get the wizard to do its work.

Eclipse - Navigation

Eclipse - Navigation


Navigating the Eclipse Workspace
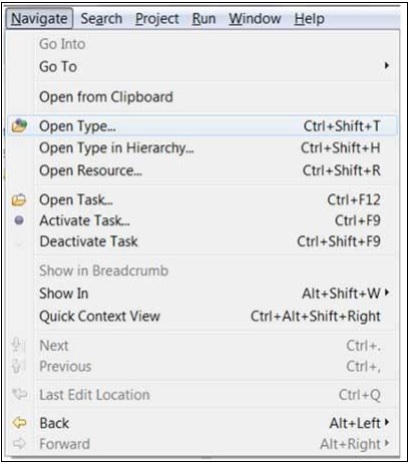
The navigate menu provides a number of menu items that allow you to quickly locate and navigate to a resource.
Navigation
Among them, the Open Type, Open Type in Hierarchy and Open Resource menu items tend to be very useful.

Open Type

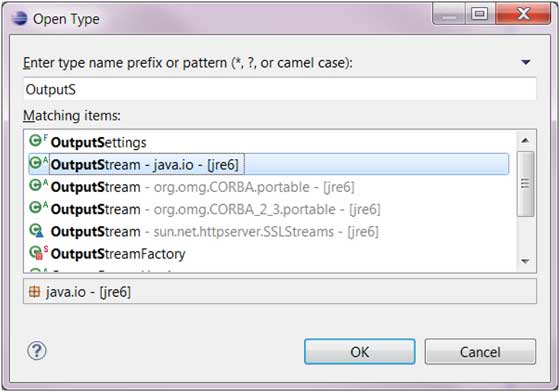
The Open Type menu item brings up a dialog box that allows you to locate a Java type. In the filter text box enter in either the fully qualified name or name of a class. The '*' character which stands for 0 or more characters and '?' which stands for a single character can be used to specify patterns. The dialog box will show all the names that match the given pattern.
Open Type
Select the type you are interested in and click OK.
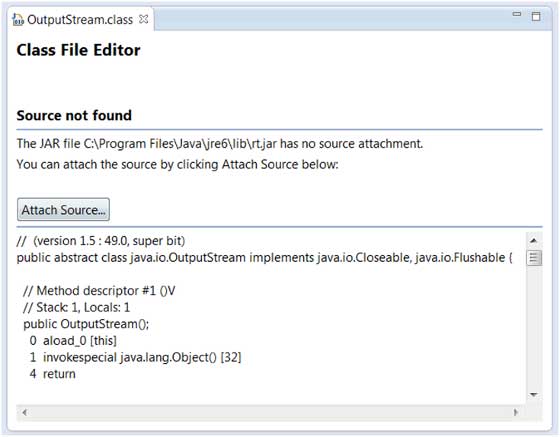
Eclipse will open up an editor showing the selected type. If source code is not available for the selected type it will use the Class File editor to show the byte code of the selected type.
Class File Editor
You can use the Attach Source button to specify where the source code for the class is located.
The source code for the types that comes with the java distribution is in src.zip which is located in the java home folder.

Open Type in Hierarchy

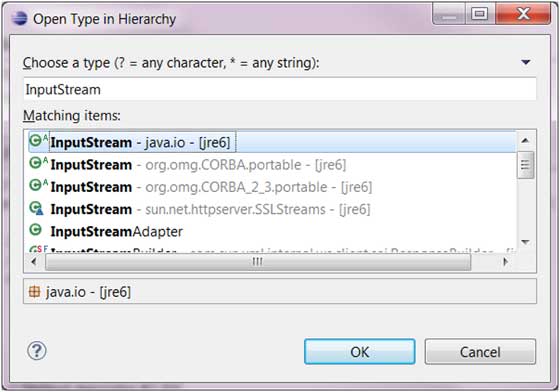
The Open Type in Hierarchy menu items allows you to open a type in the Type Hierarchy view. The Open Type in Hierarchy dialog box can be used to locate any Java type in the build path.
One Type in Hierarchy
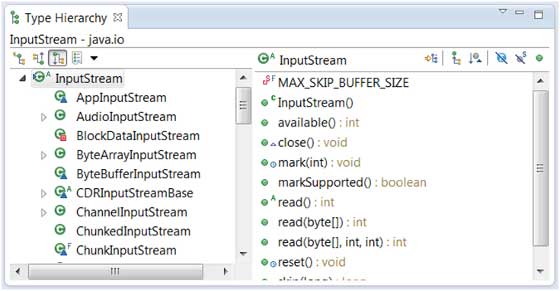
Once you select a type, its hierachy is shown in the Type Hierarchy view.
Type Hierarchy
The Type Hierarchy is an excellent view for learning about the hierarchy of a type. On the left hand side pane type, its super type and sub type are available. On the right hand side pane you can see the attributes and methods of a selected type are shown.

Open Resource

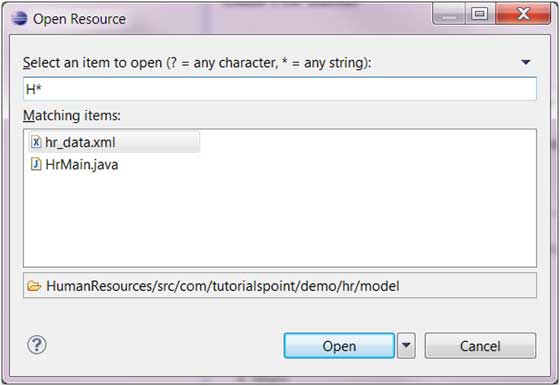
The open resource menu item can be used to locate a file in the workspace. The '*' character which stands for 0 or more characters and '?' which stands for a single character can be used to specify patterns. The dialog box will show all the names that match the given pattern.
Open Resource
Select the file that you want to open in an editor and click on the OK button.

Eclipse - Search Menu

Eclipse - Search Menu


Searching the Workspace
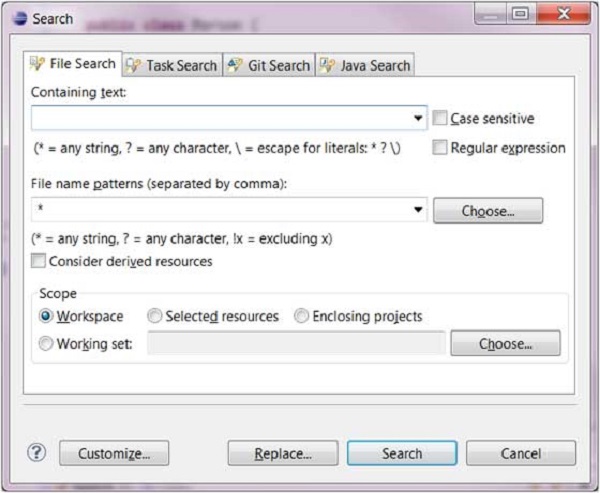
The Eclipse search dialog box allows you to search for files that contain a literal or a character pattern in the entire workspace, a set of projects, a specific project or folders selects in the package explorer view.
The search dialog box can be invoked by −
  • Clicking on the Search menu and selecting Search or File or Java.
  • Clicking Ctrl + H.
Search
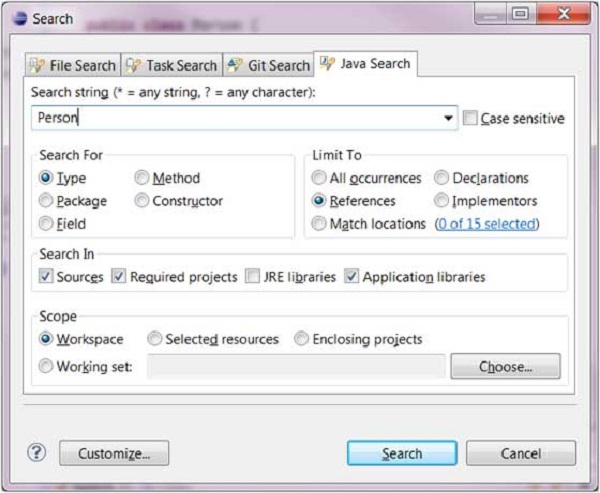
The File Search page allows you to search any type of file but the Java Search page focuses on Java files only.
Java Search
For example, to search for usage of the Person type, in the Java Search page −
  • Enter Person into the search box.
  • Set the Search For radio button to Type.
  • Set the Limit To radio button to References.
  • Click Search.
The search result appears in the Search View.

Eclipse - Hover Help

Eclipse - Hover Help


Using Hover Help
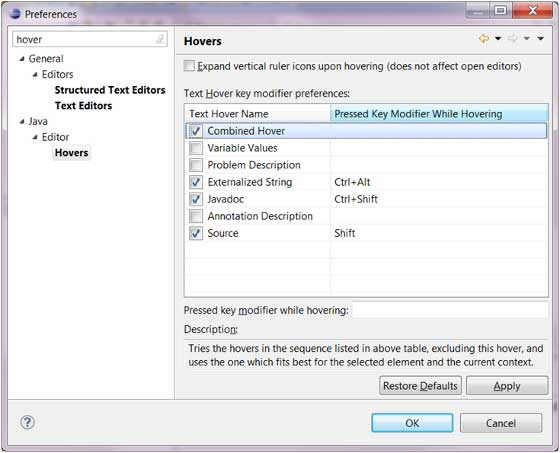
The java editor is associated with different type of hovers. A hover provides additional information about the element under the mouse pointer. All the hovers associated with a java editor can be seen in the Java editor Hovers preference page.
Hover Help
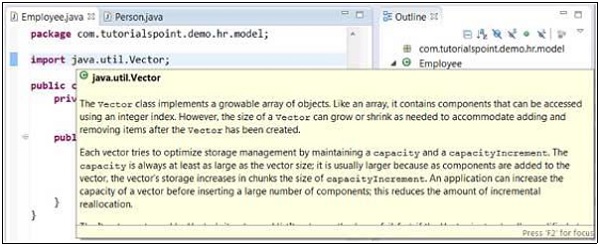
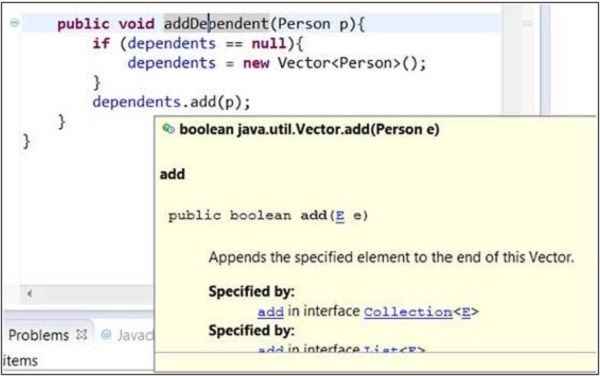
In the java editor, placing the mouse pointer over the class being imported displays the java doc associated with that class.
Display Java Doc
Placing a mouse pointer on a method shows the java documentation for that method.
Java Documentation

Eclipse - Quick Fix

Eclipse - Quick Fix


Using Quix Fix
As you type characters into an eclipse editor it analyzes the document content for potential error and warnings. The java editor uses the java syntax to detect errors in the code. When it finds error or warning, it −
  • Highlights errors using red squiggly lines.
  • Highlights warnings using yellow squiggly lines.
  • Displays errors and warnings in the
    Problem
    view.
  • Adds a light bulb with a warning sign or error sign to the vertical ruler.
The quick fix dialog provides a list of possible corrections. The quick fix dialog can be invoked by −
  • Placing the mouse pointer on a squiggly line.
  • Clicking on the light bulb.
  • Placing the cursor in the highlighted text and selecting Quick fix from the Edit menu or clicking shortcut Ctrl + 1.
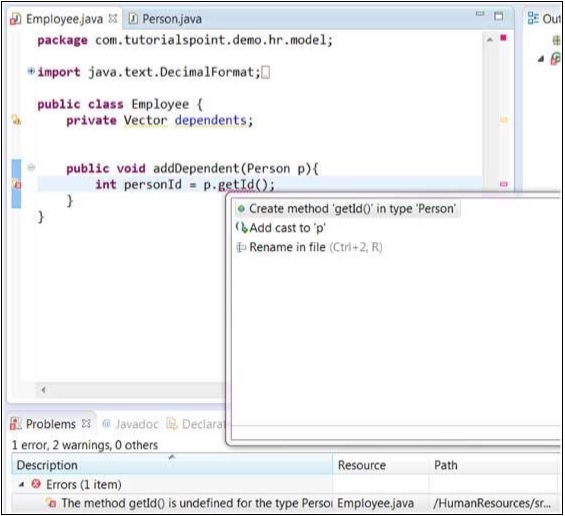
Quick Fix Dialog
In the above diagram, getId is highlighted because the Person class does not have a method called getId(). Selecting Create method 'getId()' in type 'Person' would cause the getId() method to be added to the Person class.
The Quick Fix dialog can also be displayed by right clicking on the error item in the Problems view and selecting the Quick Fix menu item.

Eclipse - Content Assist

Eclipse - Content Assist


Using Content Assist
Within an editor, content assist helps reduce the characters typed by providing a context sensitive list of possible completions to the characters already typed. The context assist can be invoked by clicking Ctrl + Space.
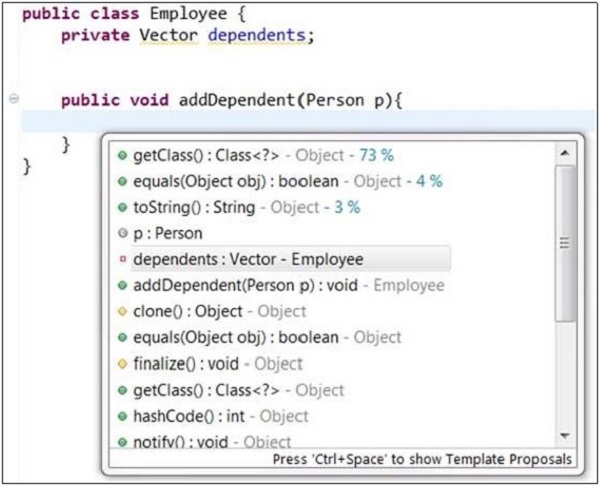
If you are editing the body of a method in the java editor and press Ctrl + Space on a new line it will bring up a dialog showing −
  • The class variables
  • The class methods
  • Super class methods
  • Other relevant classes
Content Assist
To select an item from the list just highlight the item using the up or down arrow keys and press enter.
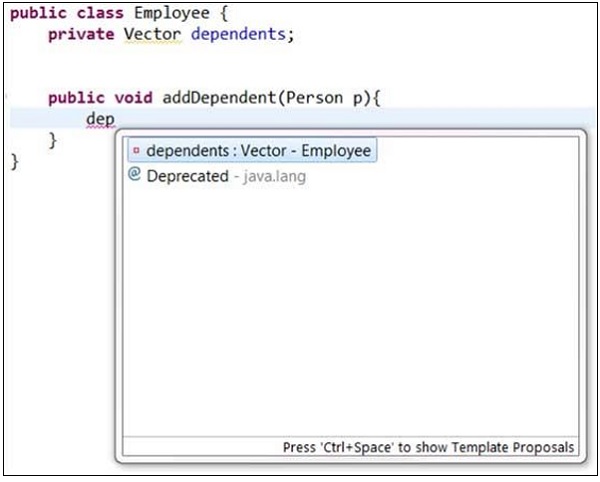
If you type some characters and then press Ctrl + space the dialog box will show only items that start with the characters typed in.
Template Proposal

Eclipse - Preferences

Eclipse - Preferences


Setting Preferences
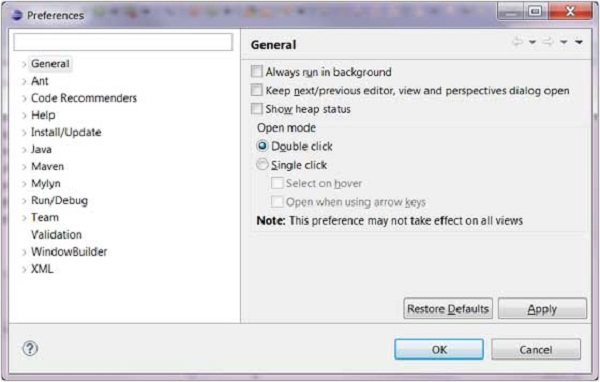
The Preferences dialog allows Eclipse users to manage their preferences. This dialog box is managed by the framework but any plug-in can add multiple pages to the dialog box.
To invoke this dialog, click on the Window menu and select the Preferences menu item.
The preference pages are organized by category. You can locate a preference page by expanding the nodes of the tree in the left hand side of the dialog box.
Preference
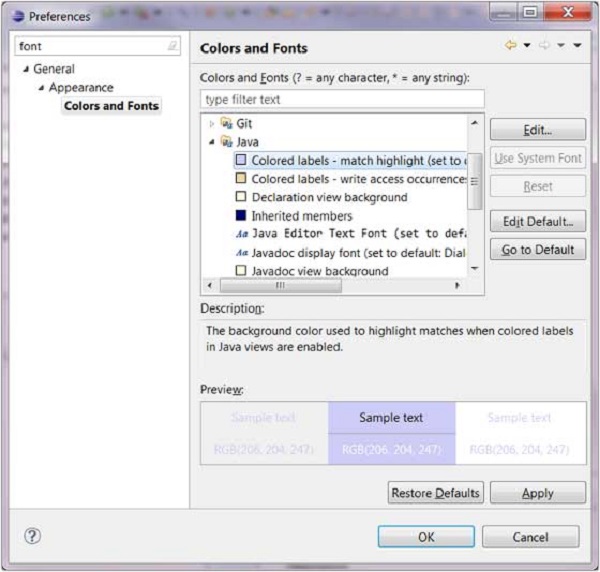
The filter text box on the left hand side top corner allows you to quickly locate a preference page. As you type characters into the filter text box the items shown in the left hand side tree are filtered. For e.g. type in font to quickly get to the Font preferences page.
Preference Color and Fonts
After you make changes to the appropriate preferences click on the OK button to save the changes and close the dialog box or click on the Cancel button to discard the changes and close the dialog box.

Eclipse - Debugging Program

Eclipse - Debugging Program


Debugging a Java Program
The quickest way to debug a Java program is to using the Package Explorer view. In the Package Explorer view −
  • Right click on the java class that contains the main method.
  • Select Debug As → Java Application.
The same action can be performed using the Package Explorer by selecting the class that contains the main method and clicking Alt + Shift + D, J.
Either actions mentioned above create a new Debug Configuration and use it to start the Java application.
If a Debug configuration has already been created you can use it to start the Java application by selecting Debug Configurations from the Run menu, clicking on the name of the debug configuration and then clicking on the Debug button.
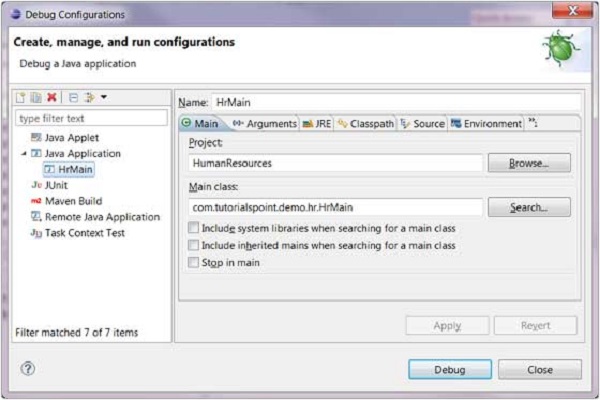
Debug Program
The Debug menu item on the Run menu can be used to restart the java application that was previously started in the debug mode.
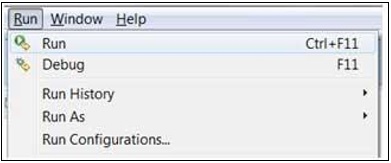
Run Menu
The shortcut key to launch the previously launched Java application in the debug mode is F11. When a java program is started in the debug mode, users are prompted to switch to the debug perspective. The debug perspective offers additional views that can be used to troubleshoot an application.
The java editor allows users to place break points in the java code. To set a break point, in the editor area right click on the marker bar and select Toggle Breakpoint.
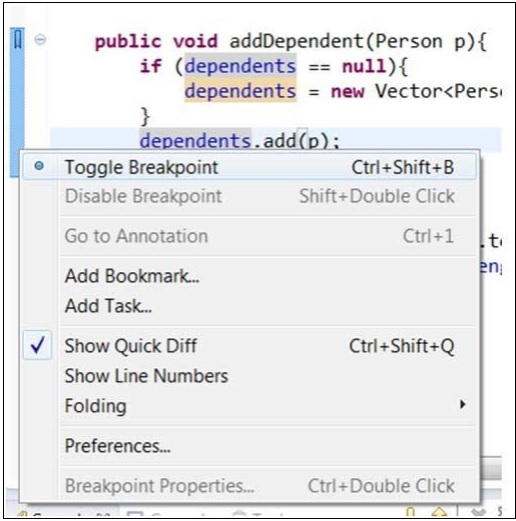
Java Editor
Breakpoints are shown on the marker bar. They are also visible in the Breakpoints View.
When the execution of code reaches a break point the JVM suspends the execution of the program. At this point, you can inspect the memory and execute the program in a controlled manner.
When the execution of a program is paused, the debug view can be used to inspect the call stack.
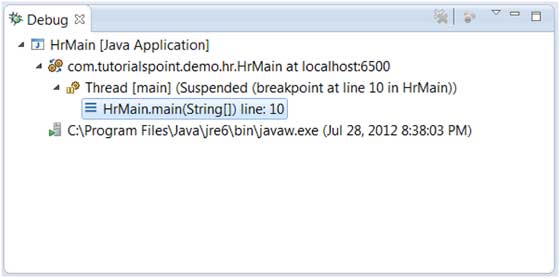
Debug Call Stack
The variables view can be used to inspect the value of variables.
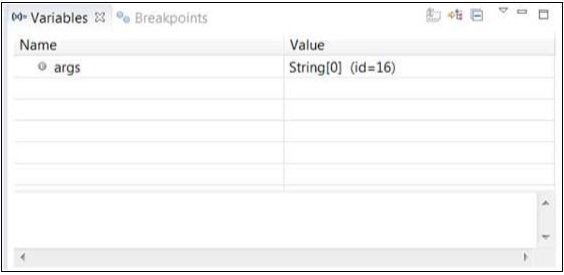
Value of Variable
The run menu has menu items that allow you to Resume execution, step over a line of code, step into a function etc.
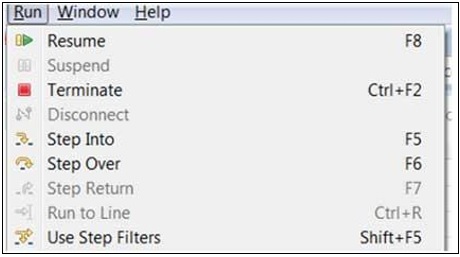
Run Menu Items
The picture given above shows the shortcut keys associated with actions such as Resume, Step Into and Step Over, etc.